About
C/Python dashcam built with Gstreamer/Raspivid for Raspberry Pi/BeagleBone Black. Currently in development. Supports webcams with hardware H264 or MJPEG encoders and the RaspberryPi camera module. Below are test videos of boot times and recording quality compared to a FineVu CR-500HD. Currently only records video, the audio in the test video is from the CR-500HD. The distortion at the start of both videos wasn't in the original videos but happened after cutting the clips in an editor. There is also some distortion in the video from the Raspberry Pi this is caused by usb issues which limit the camera from working above 720p. The BeagleBone Black is able to run at 1080p without any issues. The RaspberryPi camera module will run at 1080p without any issues.
Rasperry Pi + Logitech C920 and FineVu CR-500HD
BeagleBone Black + Logitech C920 and FineVu CR-500HD
Boot Times
Raspberry Pi: 19s
FineVu CR-500HD: 26s
BeagleBone Black: 28s
Storage
Raspberry Pi (16gb/720p/30fps/Logitech C920): 9 hrs 45 mins
BeagleBone Black (16gb/1080p/30fps/Logitech C920): 9 hrs 30 mins
FineVu CR-500HD (16gb/1080p/30fps): 3 hrs 30 mins
Webcams
The best webcam to use is the Logitech C920 or any webcam with an H264 encoder supported by v4l2. Other webcams with MJPEG will work but MJPEG has very little compression so only about an hour of video will fit on a 16gb card. Run v4l2-ctl --list-formats-ext to check for supported formats and look for H264 or MJPG pixel formats.
Required Parts
To use all the features you will need the parts below. The LED is used to display the status of the recording. The real time clock module is used to put the date and time in the filename of output videos.
- Raspberry Pi or BeagleBone Black
- Logitech C920 or RaspberryPi camera module
- Powered USB Hub
- [Optional] LED + resistor + wire + soldering iron
- [Optional] Real time clock module
Raspberry Pi Arch Linux Install
Connect the sd card and download Arch Linux ARM image. Unzip it and write it to the sd card. Full directions for Windows and Linx are on archlinuxarm.org.
# The link below may be out of date, goto the link above to find latest image
$ wget http://archlinuxarm.org/os/rpi/archlinux-hf-2013-06-15.img.zip
$ unzip archlinux-hf-2013-06-15.img.zip
$ dd bs=1M if=archlinux-hf-2013-06-15.img of=/dev/sdX
# Use gparted to extend root partition
BeagleBone Black Arch Linux Install
If you want to always boot from the sd card first connect BeagleBone Black with usb and rename the MLO file in the boot partition. If you don't rename the file you will need to hold the boot selection button when booting. Then fdisk the sd card to create partitions and extract the tarball's. Full directions for Linux are on archlinuxarm.org.
# List all disk divices, look for sd card
$ fdisk -l
# Fdisk the sd card
$ fdisk /dev/sdX
# Type o to clear partitions
# Type n, enter, enter, enter, +64M
# Type t then e
# Type a
# Type n, enter, enter, enter, enter
# Type w to write partitions
$ mkfs.vfat -F 16 /dev/sdX1
$ mkfs.ext4 /dev/sdX2
$ wget http://archlinuxarm.org/os/omap/BeagleBone-bootloader.tar.gz
$ mkdir boot
$ mount /dev/sdX1 boot
# Tar command will print change ownership errors
$ tar -xf BeagleBone-bootloader.tar.gz -C boot
$ umount boot
$ wget http://archlinuxarm.org/os/ArchLinuxARM-am33x-latest.tar.gz
$ mkdir root
$ mount /dev/sdX2 root
$ tar -xf ArchLinuxARM-am33x-latest.tar.gz -C root
$ umount root
Install
Connect sd card and network cable then power on the device.
# Scan local network to find dhcp address of device
$ nmap -sn 10.0.0.0/24
# SSH to device
$ ssh root@10.0.0.150
# Update packages
$ pacman -Syu
# Install dev packages and yaourt to sync from AUR
$ pacman -S base-devel yaourt
# If you have a speaker install pygame to play dashcam starting sound
$ pacman -S python2-pygame
For Raspberry Pi LED support install RPi.GPIO Python library.
$ yaourt -S python2-raspberry-gpio
# Press n, y, y and enter
For BeagleBone Black LED support install BBIO.GPIO python library.
$ yaourt -S python2-bbio
# Press n, y, y and enter
If you're using the RaspberryPi camera module it must be enable by adding the two lines below to boot config.
$ nano /boot/config.txt
start_file=start_x.elf
fixup_file=fixup_x.dat
If you're using the Logitech C920 install the patched gst-plugins-good to fix support for C920.
$ yaourt -S gst-plugins-good-c920
# Press n, y, y and enter
Dashcam Install
Install dashcam from AUR. Then create directory to store dashcam videos. To auto start on boot enable the systemd service. When the application starts two beeps will be played, when recording starts/stops the LED will turn on/off.
$ yaourt -S dashcam
# Press n, y, y and enter
$ mkdir -P /media
$ systemctl enable dashcamd.service
Dashcam Configuration
Edit /etc/dashcam.conf to change dashcam settings. Below is an example configuration. After editing config run systemctl start dashcamd.service to start service or dashcam to test.
#!/usr/bin/python2
# V4l2 input device or 'raspivid' for raspberry pi camera module
input_device = '/dev/video0'
# Webcam input media type. For H264 webcams use 'video/x-h264' for MJPEG
# webcams use 'image/jpeg'. Check 'v4l2-ctl --list-formats-ext' to find
# correct media type. Option not aviable with RPi camera module.
input_media_type = 'video/x-h264'
# Delay in microseconds between file segments. Sometimes the webcam will give
# device is busy error if this value is too low. 10000 = 0.01 seconds. Option
# not aviable with RPi camera module.
input_device_delay = 10000
# Webcam width. Check 'v4l2-ctl --list-formats-ext' to get valid values.
input_width = 1920
# Webcam height. Check 'v4l2-ctl --list-formats-ext' to get valid values.
input_height = 1080
# Webcam frame rate. Check 'v4l2-ctl --list-formats-ext' to get valid values.
input_frame_rate = 30
# Output muxer. Can be 'avimux' for avi files or 'matroskamux' for mkv files.
# If input_media_type is 'video/x-h264' then 'mp4mux' can also be used for
# mp4 files. Option not aviable with RPi camera module.
output_muxer = 'avimux'
# Length in seconds of each video segment. A new video file will be created
# at this interval.
output_segment_length = 300
# Output path for video files. If a real time clock is installed a strftime
# formatted file name can be used '%Y_%m_%d_%H_%M_%S' will put the full date
# and time into the filename. When using strftime the filename must be done
# so that when the files are alphabetized the oldest file will be the first
# in the list, this is used to auto delete old videos when space is low.
# Using '%i' will add a four digit incremented number to the filename, after
# reaching 9999 it will restart back at 0. When using '%i' it must be at the
# end of the filename before the file extension and cannot be adjacent to any
# %X strftime formatters. File extension must be set to the output_muxer type
# or if using RPi camera module set to '.h264'.
output_path = '/media/dashcam_%i.avi'
# This file is used by the gstreamer process to communicate the state of the
# stream to the python process which will turn the LED on and off. Option not
# aviable with RPi camera module.
stream_state_path = '/var/run/dashcam_stream_state'
# Decimal minimum percent of free space before the oldest videos are
# automatically removed to make space for new videos. The space is checked
# every second so even with a long file segment no more than 5% or 0.05
# is necessary. Set to None without quotes to disable auto deletion.
min_free_space = 0.05
# Decimal percent volume level of dashcam starting beep. Python module
# pygame must be installed for sound to work. Set to None without quotes to
# disable sound.
volume_level = 0.75
# GPIO pin that the LED is connected to. If you connected the LED to the pins
# shown in the readme the pin for the Raspberry Pi will be 13 and 'P8_10'
# for the BeagleBone Black. GPIO package must be installed for LED to work.
# Set to None without quotes to disable LED.
light_gpio_pin = 13
# Location of log file. Set to None without quotes to print output to console.
log_file_path = '/var/log/dashcam.log'
# Enable debug output.
debug = True
# Optional v4l2/raspivid parameters to set. The autofocus on some webcams may
# not focus properly, 0 is usually the best manual focus for dashcam.
# Brightness and contrast can also be adjusted, run 'v4l2-ctl --list-ctrls' or
# 'raspivid --help' to get a full list of available controls.
# v4l2 example
# output_params = {
#     'focus_auto': 0,
#     'focus_absolute': 0,
#     'brightness': 128,
#     'contrast': 128,
#     'saturation': 128,
#     'sharpness': 128,
# }
# raspivid example
# output_params = {
#     'sharpness': 50,
#     'brightness': 75,
#     'saturation': 75,
#     'exposure': 'night',
#     'awb': 'sun',
#     'rotation': 180,
#     'hflip': None,
#     'vflip': None,
#     'vstab': None,
# }
LED Setup
You will need an LED, resistor and wire. The LED, resistor and jumper wire with female connections are sold at Radio Shack. If you need a long wire for LED you can also cut apart a cat 5 ethernet cable and pull a wire pair out. The power coming from the BeagleBone Black or Raspberry Pi will be 3.3V, to get the minimum resistor use (3.3V - {LED voltage}) / ({LED current of LED} * 0.001) = resistor ohms. Example (3.3V - 2.6V) / (28mA * 0.001) = 25ohm. The higher the resistor above the minimum the dimmer the LED will be. Below is a picture of the brightness of some resistors.


First look at the LED one the of wires will be longer and have a smaller plate inside the LED this is the positive/anode. Then clip the metal wires coming out of the LED and resistor.

Solder the resistor and wires to the LED. It doesn't matter which side of the LED the resistor is on.

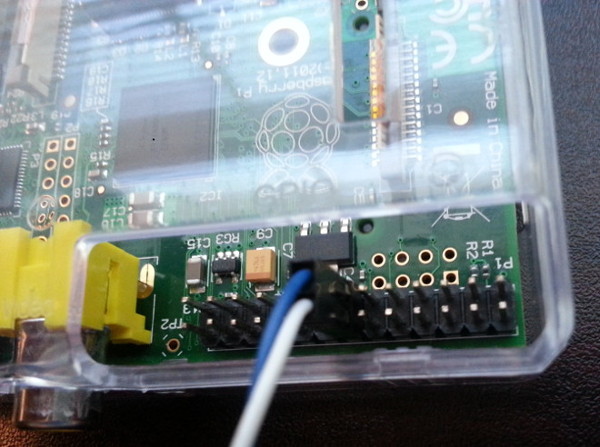
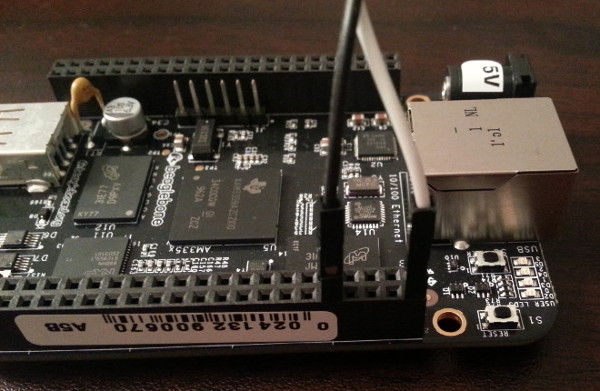
Connect the LED to the pins shown below. The darker wire is the positive/anode.

